Keras使我们搭建神经网络变得异常简单,之前我们使用了Sequential来搭建LSTM:。
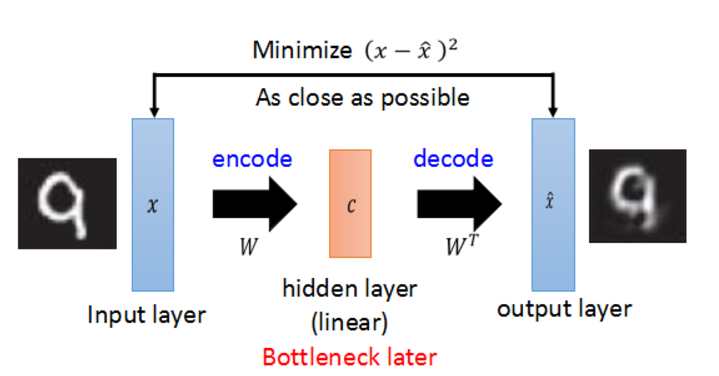
我们要使用Keras的functional API搭建更加灵活的网络结构,比如说本文的autoencoder,关于autoencoder的介绍可以在这里找到:。
现在我们就开始。
step 0 导入需要的包
1 import keras2 from keras.layers import Dense, Input3 from keras.datasets import mnist4 from keras.models import Model5 import numpy as np
step 1 数据预处理
这里需要说明一下,导入的原始数据shape为(60000,28,28),autoencoder使用(60000,28*28),而且autoencoder属于无监督学习,所以只需要导入x_train和x_test.
1 (x_train, _), (x_test, _) = mnist.load_data()2 x_train = x_train.astype('float32')/255.03 x_test = x_test.astype('float32')/255.04 #print(x_train.shape)5 x_train = x_train.reshape(x_train.shape[0], -1)6 x_test = x_test.reshape(x_test.shape[0], -1)7 #print(x_train.shape) step 2 向图片添加噪声
添加噪声是为了让autoencoder更robust,不容易出现过拟合。
1 #add random noise2 x_train_nosiy = x_train + 0.3 * np.random.normal(loc=0., scale=1., size=x_train.shape)3 x_test_nosiy = x_test + 0.3 * np.random.normal(loc=0, scale=1, size=x_test.shape)4 x_train_nosiy = np.clip(x_train_nosiy, 0., 1.)5 x_test_nosiy = np.clip(x_test_nosiy, 0, 1.)6 print(x_train_nosiy.shape, x_test_nosiy.shape)
step 3 搭建网络结构
分别构建encoded和decoded,然后将它们链接起来构成整个autoencoder。使用Model建模。
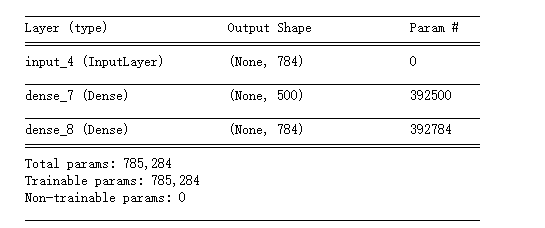
1 #build autoencoder model2 input_img = Input(shape=(28*28,))3 encoded = Dense(500, activation='relu')(input_img)4 decoded = Dense(784, activation='sigmoid')(encoded)5 6 autoencoder = Model(input=input_img, output=decoded)
step 4 compile
因为这里是让解压后的图片和原图片做比较, loss使用的是binary_crossentropy。
1 autoencoder.compile(optimizer='adam', loss='binary_crossentropy')2 autoencoder.summary()
step 5 train
指定epochs,batch_size,可以使用validation_data,keras训练的时候不会使用它,而是用来做模型评价。
autoencoder.fit(x_train_nosiy, x_train, epochs=20, batch_size=128, verbose=1, validation_data=(x_test, x_test))
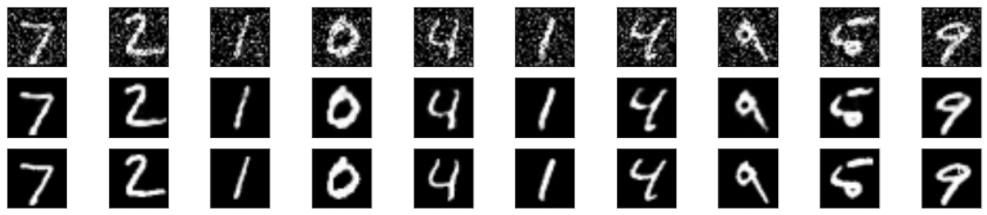
step 6 对比一下解压缩后的图片和原图片
1 %matplotlib inline 2 import matplotlib.pyplot as plt 3 4 #decoded test images 5 decoded_img = autoencoder.predict(x_test_nosiy) 6 7 n = 10 8 plt.figure(figsize=(20, 4)) 9 for i in range(n):10 #noisy data11 ax = plt.subplot(3, n, i+1)12 plt.imshow(x_test_nosiy[i].reshape(28, 28))13 plt.gray()14 ax.get_xaxis().set_visible(False)15 ax.get_yaxis().set_visible(False)16 #predict17 ax = plt.subplot(3, n, i+1+n)18 plt.imshow(decoded_img[i].reshape(28, 28))19 plt.gray()20 ax.get_yaxis().set_visible(False)21 ax.get_xaxis().set_visible(False)22 #original23 ax = plt.subplot(3, n, i+1+2*n)24 plt.imshow(x_test[i].reshape(28, 28))25 plt.gray()26 ax.get_yaxis().set_visible(False)27 ax.get_xaxis().set_visible(False)28 plt.show()
这样的结果,你能分出哪个是压缩解压缩后的图片哪个是原图片吗?
reference: